We want to make sure your Reunion experience is seamless and isn’t interrupted because of a technical problem. If you happen to run into an issue, we’re here to help! Please don’t hesitate to email Alumni_Events@brown.edu for technical support.

We will be answering any technical support questions on Saturday, May 28, 2022 from 6:30-10:30 p.m.
Brown Trivia Game Support

The Trivia game begins promptly at 7:00 p.m. ET on Saturday, May 28th.

Yes. The host will walk the teams through game rules, including how it will be played and how to get their team registered on our trivia website. All teams will be asked not to shout out answers and can be muted if necessary.

As players join the event, they will register their team at our quiz website to submit answers. You can see what the interface looks like here. Teams will discuss answers in private breakout rooms and submit all answers at the end of the round.

No! However, we encourage you to turn your webcams on if you have them available to you. Otherwise, you are able to play and participate over Zoom if you do not have a webcam on your device.

Zoom video conferencing technical support

Make sure you have downloaded the latest version of Zoom on the device you plan to use during the event. This will ensure you can use all of the Zoom features your event is offering.

Internet connection 

You’ll need at least 10 Mbps for download speed and 5 Mbps for upload speed. Use Speedtest.net to determine your internet speed.

Browser / client requirements 

You’ll need the latest version of the Zoom Desktop Client or Mobile App. For desktop use, see minimum browser requirements.

Testing

Test your internet connection, microphone, camera, and Zoom account settings by joining a test meeting.

Step 1: Receive your participation link.

Step 2: Join the meeting. 

Once you have received your link, you can join a meeting by clicking the meeting link or going to join.zoom.us and entering in the meeting ID. When you log in, Zoom will ask you how you want to connect your audio. On most devices, you can join computer/device audio by clicking “Join Audio,” “Join with Computer Audio,” or “Audio.”

While you are in your breakout room, you and the other members in your group are completely isolated in terms of audio and video, and only those in your group are able to hear the specific discussion you are participating in. After your separate breakout/conversation, you will return to the main event with the remainder of the participants. Learn more about participating in breakout rooms.

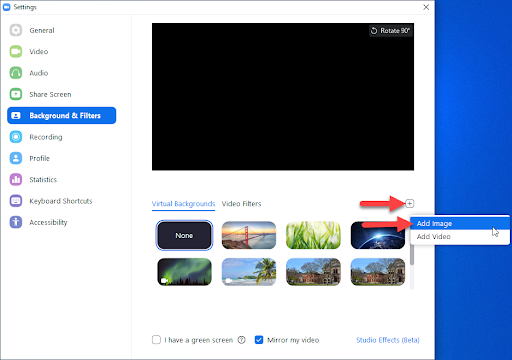
If you have a Zoom account and are looking to use your downloaded Brown Zoom background for your next event, follow these simple steps on how to upload it to Zoom.

Haven’t downloaded a Reunion background yet? Visit the “More Reunion Fun” virtual backgrounds web page

  1. Open the app and log into your Zoom account. 
  2. Click the gear icon in the top right-hand corner to navigate to "Settings." 
  3. In the left menu, click "Virtual Background."
  4. Select one of Zoom's default background images or click the + icon to upload your own photo.

Zoom screenshot

Zoom Help Center offers a step-by-step guide on logging in and fixing problems with your camera or audio. Please visit support.zoom.us for detailed information.

Class Hangout Support

To prepare for your upcoming class hangout, we've pulled together instructions and best practices to help you successfully navigate the virtual platform.

  • Click on your access link provided to you through registration. 
    • You will be prompted to enter your email, name, and password. Once you create your account, you’ll be registered. 
  • This virtual platform works best on a laptop or PC using the Google Chrome browser.
  • Close out of Zoom or any other video platform to avoid camera/microphone issues.
  • Please note, Remo currently does not have built-in virtual background functionality.
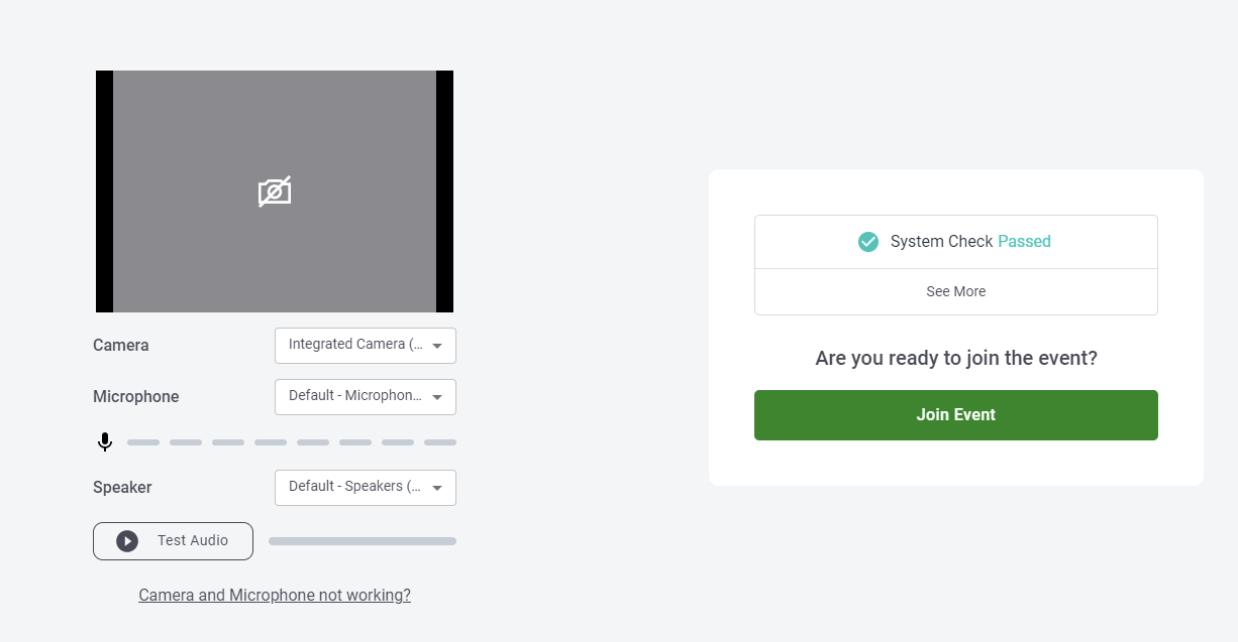
  • Before joining an event, Remo (the class lounge platform) will automatically run a system check to ensure your camera, microphone, and speakers are working.
  • This will also check your network connection and browser.
  • You can also run a system check manually by going to geartest.remo.co.
  • If your system “fails” the gear test, join the event anyway so that we can troubleshoot.

Remo System Check Screenshot

  • You will be prompted to fill out profile details. Other users will be able to see your profile details by clicking on your profile icon during the event. You can edit your profile at any time by clicking your icon in the top right corner of your screen.
  • We suggest adding the following information to your profile:
    • First name
    • Last name and/or last name at graduation
    • Class year
    • Profile picture
  • On the day of the event, simply navigate to the event link and log in to join the event.
  • When you first join the event, you will be placed in the lobby. Here you will be able to connect with customer service should you need technical assistance.

Faunce House and a table set up in Remo

  • From there, please join your classmates by navigating to your Reunion year by selecting the Event Directory drop-down bar at the top of the page.

Navigating Remo: The main event for Reunion Weekend and related events for Recent Grads and 25th - 40th reunions

When you arrive, you will be randomly placed at a table. We recommend leaving your camera and microphone off until you find your table.

  • Each table functions as a small group video chat; the seats represent the number of people who can join that table.
  • To join a table, hover over it with your cursor and double-click on it. When you join a table, a “knock, knock” sound will play, alerting participants at the table that you are joining them.

The quiet green recreated in Remo with the Carrie Tower and Blueno

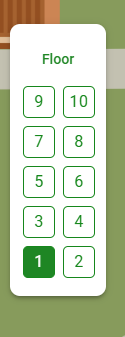
  • There will be multiple “floors” within your class lounge to accommodate more tables and participants.
  • The list of floors will be located on the left side of the screen.
  • Clicking on the floor number will prompt you to move to that floor.
  • When you move to a different floor, we recommend turning your camera and microphone off, as you will be randomly placed at a table whenever you move to a different floor.

Moving Between Remo Floors Screenshot

The control panel on the bottom of the screen is where you can control your camera and microphone, change your view of the screen, and access the chat.

  • “Tile view” allows you to see the screens of each table member in a larger format that covers the floor plan (ideal for honing in on conversations).
  • “Back to Floor” allows you to see the videos at the top of the screen and the larger floor plan (ideal for seeing the floor plan while still conversing with your table).

Remo Toolbar Screenshot

There are three ways to chat:

  • The general chat allows you to chat with the entire event’s participants.
  • The table chat allows you to chat with your table.
  • The private chat allows you to message other participants directly.
  • Clicking the three-dashed line icon in the top left corner of the screen will allow you to check your camera/microphone settings. When in doubt, refresh your browser.
  • When in doubt, refresh your browser.
  • Still need help? Check this troubleshooting guide for audio feedback/echo.
  • If you have any technical issues during the event:
    • Please visit the Lobby and speak with a Customer Service representative.
    • You can also contact Remo’s customer support via the “Need help?” icon in the bottom-left corner of the screen.